QuickBooks Inventory with the Plugin
The Plugin will maintain inventory in IntelliTrack and QuickBooks Desktop for the items originating in QuickBooks. Once the inventory is imported, you are able to adjust inventory as well as receive and pick orders in IntelliTrack and send this information back to QuickBooks.
To establish the initial dataset, we recommend performing the initial data synchronizations manually at the Synchronization tab in the Plugin. After the dataset is established and you are sure the Plugin is syncing data as expected, we recommend that you set up an automatic sync interval in the Plugin so that the data is automatically synced between IntelliTrack and QuickBooks Online at regular intervals.
Importing Inventory Into IntelliTrack
This is the place to start when loading the QuickBooks Desktop company data into IntelliTrack.
Importing inventory is a basic two step process.
- First, import the QuickBooks items into IntelliTrack so that they are part of the IntelliTrack Item list.
- Second, import the inventory from QuickBooks into IntelliTrack.
Importing QuickBooks® Items
When initially setting up the QuickBooks Plugin for use with IntelliTrack, you first need to import the QuickBooks inventory items into IntelliTrack so that the items are part of the IntelliTrack item list. When an item is imported into IntelliTrack, a New Item transaction is written to IntelliTrack application history. QuickBooks items are imported into IntelliTrack via the Plugin at the Synchronization tab or during an auto sync.
Importing QuickBooks Inventory
After the QuickBooks inventory type items are imported into IntelliTrack, you are ready to import the QuickBooks inventory. When inventory is imported into IntelliTrack, an Inventory Add transaction is written to application history.
Note: The QuickBooks inventory should only be imported one time into IntelliTrack.
Warning: After the inventory is imported into IntelliTrack, we recommend that you work with the inventory in IntelliTrack. Adjusting the inventory in QuickBooks will cause the inventory to become out-of-sync between IntelliTrack and QuickBooks.
QuickBooks inventory is imported into IntelliTrack via the Plugin a the Synchronization tab.
- Click the Synchronization tab to bring it to the front.
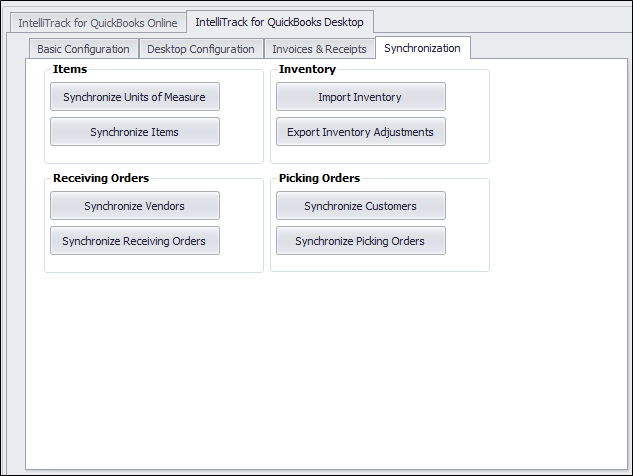
- In the Inventory portion of the tab, select the Import Inventory button.
- The status bar along the bottom of the Plugin will notify you when the inventory import is complete.
- The inventory items are imported into IntelliTrack in the Division-Site-Location selected in the Basic Configuration tab\IntelliTrack Settings portion of the Plugin.
- If the Auto Delete Inventory Records With 0 Quantity is ON for the site: the on hand quantity of the item must be greater than zero in order to be imported into IntelliTrack.
- Log into the IntelliTrack web application.
- Select Inventory > Inventory Data. The Inventory Data page appears.
- The imported inventory from QuickBooks appears in the tab in the site-location as set in the Plugin’s Basic Configuration tab.
- An Inventory Add transaction is written to IntelliTrack application history for each inventory item imported. This may be viewed at the View History page in IntelliTrack. Select Reports > History to reach this page.
Exporting Inventory Adjustments
Inventory adjustments as a result of an inventory adjustment or inventory add transaction are automatically exported from IntelliTrack to QuickBooks during an auto synchronization. Additionally, when you use the Multiple Sites feature in the Plugin, inventory adjustments as a result of inventory move transactions are also exported from IntelliTrack to QuickBooks during an auto synchronization. However, you must set a QuickBooks adjustment account in order for the Plugin to export IntelliTrack inventory adjustments to QuickBooks. You may also manually export the inventory adjustments by selecting the Export Inventory Adjustments button from the Synchronization tab in the plugin.
Setting the QuickBooks Adjustment Account
In order for the Plugin to export inventory adjustments from IntelliTrack to QuickBooks, you must set a QuickBooks Adjustment Account in the Plugin. To set the adjustment account, refer to the steps that follow.
- Open the IntelliTrack QuickBooks Plugin.
- Select the Desktop Configuration tab to bring this portion of the Plugin to the front.
- Click the Test button to make sure that the Plugin is connected to the QuickBooks company file (see "Connecting QuickBooks® Desktop to IntelliTrack" for more information). When the company file is connected to the Plugin, a Connection Test message appears: “The test was successful.”
- After verifying that the company file is connected to the Plugin, select the Basic Configuration tab to bring it to the front. Click the Search button found in the Adjustments section of the tab. The Plugin will search the QuickBooks company file for the available adjustment accounts.
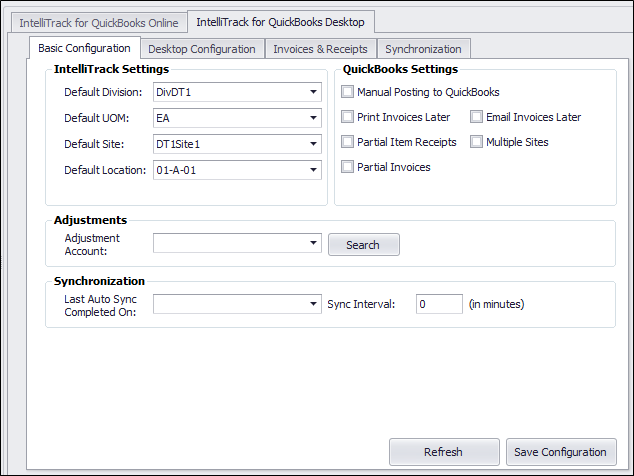
- Click the drop-down arrow in the Adjustment Account field. A list appears with the adjustment accounts available in QuickBooks.
- Select the adjustment account that you want to apply to the inventory exports from IntelliTrack to QuickBooks.
- Press the Save Configuration button to save this setting.
- Once the adjustment account is configured in the Plugin, inventory adjustment exports from IntelliTrack to QuickBooks will occur automatically during the auto sync. Or, you may manually export inventory adjustments from the Synchronization tab by pressing the Export Inventory Adjustments button.
Inventory Notes
Inventory levels for inventory part items in QuickBooks may be imported into IntelliTrack. IntelliTrack uses the Division-Site-Location and Unit of Measure (UOM) values specified in the Plugin’s Basic Configuration tab (if multiple sites are used, the Site-Location settings are found in the Multiple Sites tab).
The inventory is imported into the Inventory Data page.
Once the inventory is imported it may be adjusted in IntelliTrack and the adjustments may be exported to QuickBooks via the Plugin.
Note: Perform an item import before importing the inventory. The Plugin imports Inventory Part type items from QuickBooks to IntelliTrack.
Note: If an inventory part type item is a sub part in QuickBooks, the item sub part will import into IntelliTrack in this format: Part Number: Sub Part Number.
Reconciling Inventory
The Plugin exports the inventory adjustments for the inventory-part type items in IntelliTrack to QuickBooks.
Warning: After the inventory is imported into IntelliTrack, we recommend that you work with the inventory in IntelliTrack. Adjusting the inventory in QuickBooks will cause the inventory to become out-of-sync between IntelliTrack and QuickBooks.